

If you are not familiar with datasets, then you can checkout out
Datasets guide.
How Generators Work
PremSql generators offer two main generation strategies:- Simple Generation: Generates SQL from a prompt that includes the table schema, user question, few-shot examples, etc.
- Execution-Guided Decoding: Enhances performance by executing the generated SQL on the DB. If an error occurs, the generator uses the error message to self-correct and retries until it succeeds or reaches the maximum trials.
Input and Output for Generators
The input for generators is adata_blob, which should contains:
- prompt: The prompt to be passed to the model.
- db_path: The database path.
- model_or_name_or_path: Union[str, transformers.PreTrainedModel] The model name or path to be used for the text-to-SQL generation. It can be a string specifying the model path or a pre-loaded model object.
-
experiment_name: str
The name of the experiment. It will create a folder with this name in the
./experimentsdirectory to store the outputs. -
type: str
The type of experiment. This can be either
trainortest. Based on that it will create an experiment folder. So suppose your name is experiment is: “test_generators” then it will create a folder./experiments/test_generators_testor./experiments/test_generators_trainbased on the type. -
experiment_folder: Optional[str], default=None
The folder where experiment outputs. By default, it will be created in the
./experimentsdirectory. - hf_token: Optional[str], default=None Hugging Face token for loading private models from the Hugging Face Hub.
- device: Optional[str], default=None The device on which the model will be loaded (‘cpu’, ‘cuda’, etc.). If None, it defaults to the available CUDA device if present, otherwise ‘cpu’.
- kwargs: dict Additional arguments passed to the model or any other configurations.
Using HuggingFace Transformers
Text2SQLGeneratorHF utilizes Hugging Face Transformers. You can use any model from the
Hugging Face model hub. Now let’s generate answer for a single data point.
Output
Output
SELECT movie_title FROM movies WHERE movie_release_year = 1945 ORDER BY movie_popularity DESC LIMIT 1;
- data_blob:
dictThe data blob containing the prompt and other required information. - temperature:
Optional[float], default=0.0 The temperature value for sampling. Higher values increase diversity. - max_new_tokens:
Optional[int], default=256 The maximum number of tokens to generate. - postprocess:
Optional[bool], default=True Whether to postprocess the generated SQL query. - kwargs:
dictAdditional arguments passed to the model or any other configurations.
generate method runs a single inference without saving results.
To generate and save multiple responses inside the experiment_path, use the generate_and_save method.
experiment_path as predict.json.
On subsequent runs, the cached results are reused unless force=True is specified.
predict.json file.
Execution-Guided Decoding
This strategy executes the generated SQL against the DB and, if it fails, uses the error message for correction, repeating until it gets a valid result or the retries run out.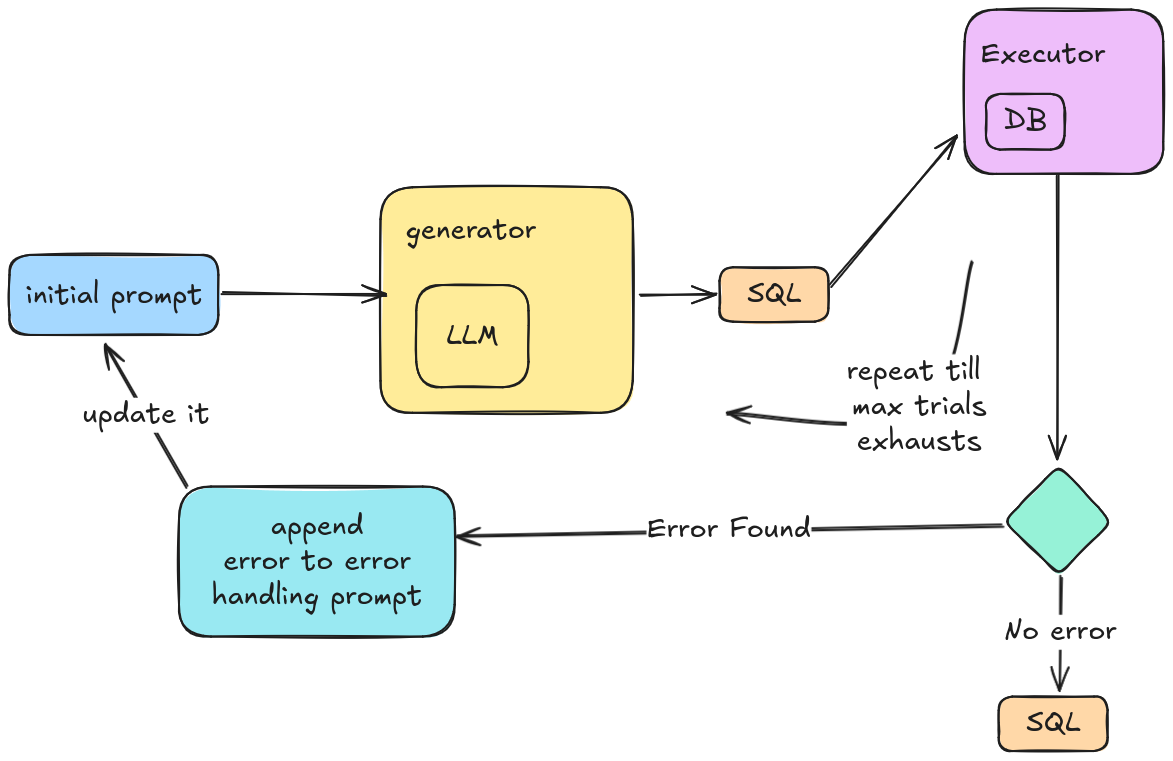
SQLiteExecutor. You can use any other executors as well.
Here’s how to use it with generate_and_save method:
Please note that Text2SQLGeneratorHF is only limited for causal models. So Sequence to Sequence
models are not supported in first hand. However you can still use them by creating a custom generator or directly
feeding the model object while initializing the generator.
More Supported Generators
Other than huggingface models, we also support Prem AI and Open AI APIs. Here is how you can use them:Prem AI Generator
Prem AI SDK provides all the best LLMs out there in a very reasonable price. You can use them in the same way as you use the Hugging Face Generators.Before getting started, make sure you have an account at Prem AI Platform and a valid project id and an API Key. Additionally, you also need to have at least one repository-id as a last requirement.
Apple MLX Generator
Please note that this generator only supports Apple Silicon devices only.
mlx is installed. If not you can install it by:
Ollama Generator
For using Ollama integration, first install Ollama, then install the Python client:Open AI Generator
It has a very similar interface like the above:Custom Generators
You can also create custom generators by extending theText2SQLGenerator class. This will
allow you to define your own generation strategies, models, and other configurations but
still use the same API as the built-in generators. Here is an example on how you can do that.
To define custom generator, you need to define four methods (mandatory):
-
load_client: Load the model and other configurations. This method acts like property and should return the model object. -
load_tokenizer: Load the tokenizer for the model. This method acts like property and should return the tokenizer object. In case your generator is not using any tokenizer, just return None. -
generate: Generate the SQL query from the prompt. This method should return the SQL query. So what ever logic is needed to run the model should be dumped here, such that the output is a single SQL query. -
model_name_or_path: Here you need to return a string which will tell either the name of the model used or the path to load the model.